Showing posts with label coloured pencils. Show all posts

Monday, May 16, 2016

Open stock Inktense

So the other week I wrote a long post on Instagram on how I discovered that I could have gotten away with getting a much smaller set of Polychromos and never missed a fair few of my 60 set. The post got a much better reception than I had anticipated, it seems I'm not the only one who doesn't think it necessary to go and get the full set of every art supply on the market. I'm not judging, honestly, if it gives you joy and you can afford it, then way to go! I love seeing poeple's haul posts! But personally I take a more practical - and tight-budgeted - approach to colouring supply purchases and look at what I actually need and will use.
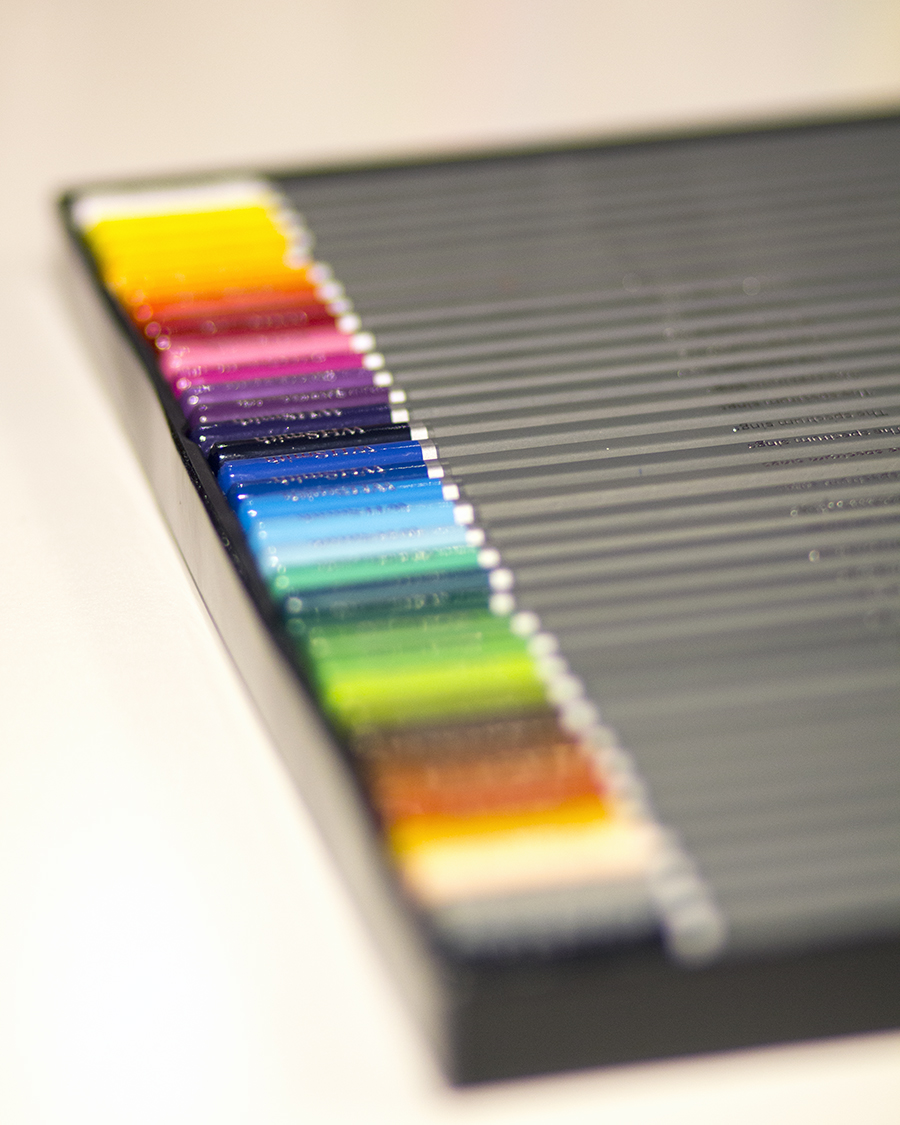
Having written that post got me thinking about my next purchase. Ever since discovering Peta Hewitt's tutorials I'd wanted to use my Inktense pencils much more, but I really felt the 24 was too small. I missed some nice greens and rich yellows, among other shades. At first I was glancing at the full 72 set but upon closer inspection I realized that it, too, containted plenty of colours I couldn't see myself using, and/or shades that were very close to each other. So I started looking around the open stock pencils on offer and in the end I purchased 18 additional pencils to my 24 set. So now I have 40 colours plus the black and the outliner. And I couldn't be happier! I got exactly the colours I want the most and don't have to pay for any I won't use. I chose some beautiful cool teals, warm yellows, warm greens and rich neutrals - don't you just adore the Red Oxide and the Madder Brown especially?
Here's a swatch of my current collection.The colours are quite accurately photographed, the paper is really this cool hue drawing paper.


I decided to store the pencils tip down in a round container. At the bottom I put some sheets of paper towel so the tips will stay safe when I put them back. This way i can conveniently see both the colour coded ends and the names - a necessity since Derwent doesn't bother colour coating the entire pencil. 


Another change I made was go through my Polychromos, pick out the ones I really didn't like and put the rest in a beautiful glass container that I decorated with découpage paper and a silk ribbon. I ended up with 40-something pencils which sort of pushes the boundries of the container but I make it work because it looks so much prettier than the big ol' tin! The pencils left inside the tin I'm using for a #rarelyusedchallenge where I colour a page using those very pencils I usually avoid! If you want to challenge yourself using colours you're usually not comfortable with, go ahead and use the #rarelyusedchallenge on Instagram to display the result! The contributions are starting to come in, I will also post mine as soon as I finish at least some of the 20-ish WIPs I have going at the moment. There are no prizes or anything, it's not a contest, just a thing to try if you need a little extra challenge in your colouring!

Wednesday, March 16, 2016

Marco Raffiné pencils - swatch and first impression

So it finally arrived, my box of the 72-count Marco Raffiné coloured pencils! I had seen the colouring community swoon and rave over these pencils for the past 6 months so I just had to see what all the fuss is about. I took the plunge when I saw the pencils being sold on Amazon for a similar price as Ebay. Earlier Amazon had some sellers but the price was so much higher than Ebay or Aliexpress that I couldn't justify getting them. Reports of ridiculously long delivery times from Ebay and Aliexpress deterred me from getting them from these sites, also I love Amazon's customer service whose generosity and solution focused approach has saved me on several occasions.

The first thing that struck me was the weight of the box. I don't know what I had thought but just seeing photos of the box never made me think it would weigh so much! It felt nice in my hand. However I discarded the box straight away, I hate flimsy cardboard boxes. Some people also complained about a strong chemical smell but I attributed this to the box. The pencils themselves smell good like wooden colouring pencils should. (I always sniff on everything new!)

The pencils never struck me as particularly handsome and real life confirmed this. The silvery finish is more plasticky than silvery and is unevenly applied on some pencils. The hexagonal shape and colour indicator on top are OK features. The wood is of varied quality: some pencils are flawless while others shave away quite a bit. However I was pleasantly surprised by the lead quality as I sharpened the whole 72 set and only got one minor tip breakage which was fixed with just a little bit more sharpening. All pencils arrived seemingly undamaged so I'm hoping that no leads are broken further inside the pencils!

The pencils have no colour names but fortunately they are numbered in a straightforward fashion, from 501 to 572, making swatching a breeze. I made a handdrawn colour chart as I currently don't possess an operating printer. Or, there is a printer but it's ink and I'm afraid to use it in colouring because the lines might smudge from blenders and such so we haven't really plugged it in.

Upon swatching I soon discovered that the individual pencils vary in quality within the set: some glide nicely along the paper giving off even and rich pigmentation, while others feel waxy and smeary and leave a patchy result. I therefore took a leaf out of Faber Castell's book and marked the individual pencils with dots from 1-3 depending on how smooth or smeary they feel. I fear the smeary ones will be very difficult to layer and blend, in addition to the feeling that you're pushing candle wax around the paper. (I know they're oil based but this is the best description to the feeling I can come up with.) Here's my quality scale and the number of pencils in each category:
3 dots (19 pencils): Superior quality, rich pigmentation, glides smoothly on the paper and leaves an even coat of colour
2 dots (38 pencils): Good quality, enough pigmentation, possible to layer and blend, no hesitation in using them. 
1 dot (15 pencils): Smeary and uneven result, and/or poor pigmentation. Use with caution in case it's a unique shade I don't have in other sets.

Palette wise I have mixed emotions. The purples and greens are great especially as I'm fussy with my greens and for example I'm not impressed with the greens in my 60 count Polychromos as I find there are to many cold greens in that set. The Raffinés contain many warm green shades that you're more likely to find in nature. The purples are also warm and rich and the yellows are surprisingly pigmented. However I find there could have been a couple more blues in stead of having so many greys. Six shades of grey are entirely too much in a set of 72. The browns and maroons are very nice, however to my disappointment, two of the dark neutrals I most looked forward to using turned out to be one-dotters. Otherwise the one-dotters seem to be mainly lighter pastelly colours which sort of makes sense, if the manufacturer achieved the pale shade by adding more binding material in stead of using a different pigment combination.

How these pencils perform on different kinds of paper and in different situations such as layering, burnishing and using with blending tools, remains to be seen. In any case I'm really looking forward to taking them for a test drive today!

Monday, March 14, 2016

Welcome Spring!

March is a particularly difficult month for me. Having lived in Hungary for several years I got used to Spring arriving in early March, with the trees starting to turn green at the turn of March/April. In these parts of Sweden March is still very much a winter month, although the snow is mostly gone and you can start seeing some fresh green moss for example. Still the temperatures are barely above freezing and there will be several minus degree days yet. Therefore I tried to colour the moth of March as cheerful as I could, with all sorts of pastelly colours. 
Mad sketching skillz!
I also included a small freehand drawing project. Since March 15 marks the anniversary of the Hungarian revolution in 1848, which is one of three Hungarian national holidays, I added the symbol of this holiday to the calendar: a cockade in the Hungarian colours red, white and green. I had never drawn such an item before so I started with looking one up on the internet. There I traced the outlines onto a bit of tracing paper that I then transferred onto a sketch pad where I experimented a bit with colours and shading. I finally transferred the sketched outlines onto the calendar page and proceeded with colouring it in. Considering my drawing skills and particularly the fact that I haven't practiced drawing for many years (or let's be honest, I have precticed drawing NEVER), I'm really quite pleased with the end result! It looks so much nicer in real life too. 


The tree is coloured in Faber-Castell Pitt Artist brush pens, and the cockade in Polychromos.


Wednesday, March 2, 2016

Blending stumps!

Pages from Dagdrömmar and Color me Calm where I prepared the background using Polychromos and paper stumps.

I get a lot of requests to explain about the paper stumps I so frequently use in my colouring projects. So here is a long overdue summary about this great tool! I personally find myself going more and more away from the colourless blender pencil, which I feel gives a more streaky and uneven finish, and using the paper stump more and more as I like the smooth smoky surface it gives. I have used it mainly for backgrounds in the past but nowadays I blend everything but the finest details with the paper stumps.
First of all, this is what they look like - a roll of cardboard with two pointy ends. You can find them in any art supply store and they are very inexpensive. I learned that there is a similar tool called a tortillon, which is hollow. These stumps are solid all the way through. I have never come across hollow tortillons in Sweden but you might want to know the difference if they are a thing in your country.

Like I shortly mentioned in my previous video, paper stumps are ideal for larger surfaces. But as they come in a variety of sizes, you can use them in quite detailed areas as well. 
Depending on how much pigment you have laid down with your pencil, you can use a very light hand, barely grazing the paper, or a more heavy touch, when blening. If you have several layers of colour on the paper it's enough to just lightly go over the paper with the stump to get a nice smoky blend. The stumps will conceal some of the streakiness in your colouring, but the blending will be much nicer if you try to lay down the colour as evenly as possible. You can clearly see the difference in this closeup where the orange bits were quite haphazardly coloured whereas the surrounding blue parts were coloured much more carefully before blending.
You can also use your blending stumps together with blending agents such as Gamsol or vaseline. However I only use mine dry so I cannot say anything about those methods. If I ever get around to trying that I'll make an update post about it!

As you can see in the first photo I keep a stump roughly per colour family. However these guys require cleaning from time to time. This is done with a piece of fine-grained sandpaper which I picked up at a hardware store. I cut the sheet in smaller sized squares so they would fit into a drawer compartment in my desk. 

Cleaning them like this will ensure they don't mess up your colour scheme and keep their point. If the point becomes too used up and frayed I just use a pair of scissors to cut it off then sharpen it again on the sandpaper. As the stumps are made of solid cardboard they will last a very long time. However if you find yourself with a pencil cup full of "dirty" paper stumps, you can create a craft project of its own and not let that precious pigment go to waste. One evening when I had no colouring inspiration I started scribbling on a blank sheet of sketching paper with a dirty stump. And before I knew it I had created this pastelly background that I can later fill with a drawing of some kind.


Below you will find a comparison closeup of two similar fields, the top one with no blending, just the layering of 2 Polychromos pencils, and the bottom one blended with a paper stump. And finally I enclose a short video that shows the layering and blending process. I hope this was helpful - Happy colouring!


Sunday, February 28, 2016

WHSmith colouring pencils - a review

A few days ago I started swatching my 36 count WHSMith colouring pencils. I was pleasantly surprised! Here's a review of these pencils.
- The pencils come in a glossy cardboard box with a plastic holder. I can see myself discarding this in the future as I tend to keep smaller sets of pens/pencils in clear containers. The design is lovely, with a dark grey pencil and colour indicators on the top. The hexagonal pencils are comfortable to hold and have a matt finish.
- The colour selection is really nice. You get all your usual primaries and secondaries that you usually see in a set of this size, and there are also some lovely and unique shades with a surprisingly good neutral palette. For example the dark teal one (last one in the third row) is one I see myself using a lot. The magenta and the brick colour are my other favourites in the set. The only shades I'm not crazy about are the two brightest yellows. They are not really pigmented and the next two yellow shades would be fully enough. But I've never been a fan of light, cool yellows, I'm more of a saffron yellow kind of person.
- The pigmentation is a pleasant surprise. These pencils are more affordable than the Staedtler Noris Club ones (at least in our currency that is the case) but lay down such a nicer pigment. You can get a vibrant colour almost instantly with very little pressure. The pencils are layerable and blend very well with each other. Compared to the Polychromos they lay down a bit more streaky colour and feel a bit more scratchy against the paper, but this can be corrected using a bit of layering. 
- The pencils came in the mail and although they were very well wrapped, it's not unusual for the leads to be damaged during transport. I haven't notice any broken leads and the pencils sharpen easily to a very fine point which they keep for a reasonable amount of time. As they are rather soft, I expect they will spend a fair amount of time in the sharpener, but this is the price for soft, pigmented pencils that lay down a creamy colour.
- I tried blending using two tools: a paper stump and a blender pencil. The paper stump easily gave the best result with these pencils. The gradient came out smoky and perfect, whereas the blender pencil mostly made a streaky, blotchy mess of the swatch. I can see myself using the blender pencil on very small areas but for anything of even the size of these swatches, a fine paper stump would be the more ideal blending tool of the two.


Conclusion: If you can get your hands on these pencils, go for it! If you already have a selection of pencils these will be great for a smaller set to take with you on the road or to add some new shades to your palette. If you're new to colouring, you may use these for a long time before feeling the need to graduate to a larger set or more prestigious brand. 

PS. When I started Lost Ocean a few days ago, I was going to use the 24-count Noris Club pencils for the whole book. But shortly after finishing the title page my hands started aching from the pressure I had to use and I was frustrated by the weak pigmentation. So I'm switching to this set of WHSmith pencils for the whole of Lost Ocean. Wish me luck!

Wednesday, February 24, 2016

Swatching in progress!

Swatching my WHSmith pencils. So far they're lovely! Will post a review once I'm finished. I'm making rather large squares because half of them I'll blend with blender pencil to display that effect as well. The white paper is laid over the finished squares to avoid smudging from my hand (I'm a leftie).

Monday, February 22, 2016

A wonderful encounter!

I have mentioned how much I like belonging to my colouring communities on Facebook. Interestingly, it's the smaller of the two groups that I prefer, it has such a nice atmosphere (so does the other one but that one's a bit too large and therefore perhaps a bit less personal).
Anyway, since haul/supply posts are fortunately allowed in these groups ;), I've had the opportunity to see a lot of people praising the WHSmith colouring pencils. To be honest, I first fell for their very handsome design. They are just so pretty on the outside! And the quote, The spectrum sings, it's just so sublime. I know I'm being silly! :) but anyhow, the other day I posted in my fave group a small complaint about how I'd love to try these pencils but WHSmith doesn't deliver to Sweden. And lo and behold, a great number of members volunteered to mail me a set!! In the end we agreed with a fellow member to swap items: I would send her the postcard book Vinterdrömmar by Hanna Karlzon (the Dagdrömmar lady!) and she would send me the pencils. 
It was of course a small leap of faith, giving out your address to a virtual stranger and everything... but it felt right! Needless to say Samantha, as her name is, got my parcel first, shame on you again and again Postnord... but today the beautiful pencils arrived! As an added bonus the parcel even fit into our mailbox so we didn't have to drive all the way to the grocery store (since we no longer have any post offices in Sweden anymore)
Upon opening the parcel there was another surprise. I thought I'd get the24 set, instead there was a 36 set of pencils in the package! I yelled out so my fiancé came running in from the car. He thought we'd been burgled as I stood in the doorway, shoes and coat still on, screaming. Lol! Then he realized it was pencils... then he was no longer surprised!


This wonderful gift came with very good timing. I've been pining after the 72 set Inktense pencils. I have the 24 set but would really love to upgrade and they are crazy expensive. Recently we talked about treating ourselves to something nice as we moved into our new house just five weeks ago and we have hardly rested, spent each waking our after work unpacking and fixing around the house. The fiancé, or S. as we can call him, was going to buy a nice pair of gaming headphones and I was going to get the Inktense. But after some calculations we agreeed to not spend anything on luxury items as there are so many expenses around the house these coming months. We agreed on this this morning so to get these gorgeous pencils, together with a new friendship, was really great for me today. Thank you, Samantha :)